Looking into Security in SQL Server October 17, 2011
Posted by fofo in Sql Server, Sql Server 2005, SQL Server 2008.Tags: Authentication, Authentication mode, Authorisation, Denial of Service, Elevation of Privilege, Information disclosure, Mixed Mode, principal, Privilege, Repudiation, securable, Spoofing identity, Tampering, Windows Authentication Mode
trackback
In this post I would like to talk about Security in SQL Server. This is a very big topic and you should embrace yourselves for a very long post.
I know there are samples of how to use secure data in BOL,MSDN and elsewhere but I thought that it would be a good idea to give it a try with hands-on examples.
Many people have found useful my style of posting. They feel they can follow the steps and master the technology/topic.
At the beginning I will give a short introduction about the various security threats that our systems face and then look into aspects of Security in SQL Server .Then I will provide many examples on how to secure data in SQL Server.
Let’s have a look at the main security threats that systems face nowadays. Obviously we can not analyse any of them too much.
Spoofing identity, means using valid user’s credentials so that an attacker can impersonate that user.
Tampering is the deliberate destruction of data.
Repudiation basically means that something that happened in our system was not properly logged or tracked leaving our system open to exploitation.
Information disclosure means that that we accidentally hand to our “enemies” valuable information about a system. Sometimes even HTTP Headers can reveal a lot of information to a malicious user.
Denial of Service is a term used to describe attacks that attempt to lower application availability and reliability.
Elevation of Privilege is a threat that occurs when the malicious user gets privileged access to a system or data.
As I said before these terms above are used to generally describe security threats in many software systems including RDBMS.
There are different kind of threats to SQL Server that DBAs and developers must be aware of.Unfortunately we do not live in a world where other people respect our systems and data.All these malicious people and programs have the potential to harm/steal our sensitive data.
They should not have access to our sensitive data.Imagine the situation where a former empoyee in your company leaves the company , not in the best terms, and has access to your SQL Server through the SA account, or any other account.We should protect the data from people like that.
But I have also found that we should protect our data from our less malicious users, people who work in our company but have not the skills or the knowledge to protect the data. Sometimes it happens that a user has more “authorisation” than he should have, on a database or a table and accidentally deletes them.Ηaving said all that, data must be protected but at the same time data must be available to the users.
It is quite obvious that the so-called “hackers” or malicious users, want to get their hands on ou system and compromise them. Delete data or interfere with our data in a catastrophic way.
As I said earlier do not underestimate the power that the “accidental” user has over the data . So make sure he does not have “rights” to access sensitive data(more on that later)..
Before I move on and explain how to set up logins,create users and roles I would like to tell you a few things that help secure SQL Server.
Some things are really simple and very easy to do.Make sure you have downloaded and installed all the latest service packs for the SQL Server version you have, running in your machine.Needless to say that you must install all patches and updates regarding Windows OS. You should install a very good antivirus program and have set up a firewall program configured properly.
Install only the components that you really need. When installing the e.g Enterprise edition of SQL Server 2008 R2 you see that there are many components that you could install.If you do not need to install SQL Server Analysis Services, SQL Server Integration Services,SQL Reporting Services then do not.Try (if this is an option for you) not to install SQL Server Reporting Services on the same server as the database engine.IIS and web services bring a lot of vulnerabilities to SQL Server.You can also disable SQL Server services that you are not going to use.Disable the VSS writer service and the SQL Server Browser.
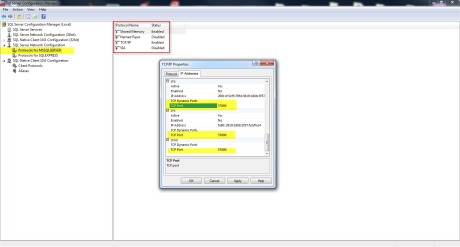
You should also disable the network protocols that aren’t required.You could,for example, disable Named Pipes and enable TCP/IP. You could do all these using the SQL Server Configuration Manager.
Have a look at the picture below. You will see that TCP/IP is enabled but configured to a different port than the default port(1433).This is also a thing you should keep in mind and apply it to your SQL Server instances. Use a different TCP/IP port than the default one.
We could break down security in two major components.
Authentication: In simple words that means who should be able to access the data.
Authorisation: In simple words that means who activities, people/entities can perform on the data when they are authenticated.
Before we move on, we should define some basic terms that are very important when we talk about security in SQL Server.
The principal access data. It should be authenticated by SQL Server which basically means that the principal should “prove” that it is , whom it claims to be.
Principal is a user a group or an application granted permission to access securables.So what is a securable? Securable is an object to which access privileges are granted.
Privilege is an action that a principal is allowed to perform an a securable.
Let’s look into principals in more detail. We have Window Principals that are windows user accounts or groups that are authenticated using Windows security.
We have SQL Server Principals are server logins or groups that are authenticated using SQL Server security.
We also have Database Principals that are database users,database roles (user defined roles or database fixed roles) and application roles.
Another very important thing you should know when configuring SQL Server to be as secure as possible is Authentication modes.
When installing SQL Server (at a certain step) you will be asked to specify the authentication mode and administrators for the Database Engine.
For all those of you, who have not installed SQL Server you will have to believe me that at a certain time during the installation process you will have to make this decision. Then again, I strongly believe that anyone working on a daily basis with SQL Server should install the product at least once.
We have two authentication modes.Windows Authentication Mode and Mixed Mode.Windows Authentication basically means that a user must log in to a windows domain or a windows local account first before logging into an SQL Server system.Basically a security token is created by Windows when someone logs in and this is passed to SQL Server that “validates” the account name and password based on that token. In a sentence the user logged in the SQL Server is checked and identified by Windows.
SQL Server validates the account name and password using the Windows principal token in the operating system.
Windows Authentication disables SQL Server Authentication.I have been asked if you can disable Windows Authentication and the short answer to that is NO.
When possible (Microsoft recommends it) use Windows Authentication only since it is inherently more secure.For example when using Active Directory you can use Group Policies which means we can enforce certain policies like “enforce users to use strong passwords” .Another very useful policy is the “Account Lockout” which locks accounts when too many failed login attempts occur.
We also have Mixed Authentication Mode which basically means Windows Authentication & SQL Server Authentication.
With SQL Server Authentication mode SQL Server manages a seperate set of users and groups to give permissions to.SQL Server logins are not based on Windows accounts,usernames and passwords are created by SQL Server and also stored there.
If you choose to have SQL Server Authentication you would have to keep credentials for your windows domain and SQL Server.When using the SQL Server Authentication make sure you create a long sa password and hide it.
In any case you need to have this authentication mode enabled especially if you need to provide access to your users outside the organisation.SQL Server Authentication does not require a domain controller.
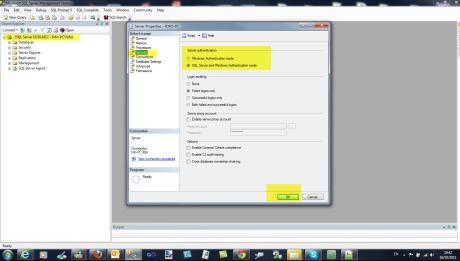
In order to change the Authentication mode, you should open SSMS and then through Object Explorer you select the instance of SQL Server , right-click on it and then choose Properties and then select Security tab.
Have a look at the picture below.
The change will take effect when SQL Server is restarted.
Another (less secure) way to have the same effect is using the following T-SQL code.
USE master
EXEC xp_instance_regwrite N'HKEY_LOCAL_MACHINE',
N'Software\Microsoft\MSSQLServer\MSSQLServer', N'LoginMode', REG_DWORD, 2

--Windows Authentication mode
USE master
EXEC xp_instance_regwrite N'HKEY_LOCAL_MACHINE',
N'Software\Microsoft\MSSQLServer\MSSQLServer', N'LoginMode', REG_DWORD, 1
Let’s move on to more hands-on examples. I think we have covered a lot of issues regarding Security in SQL Server.
We need an instance of SQL Server running in our machine. I have SQL Server 2008 R2 Developer edition installed in my machine.
In case you do not have an instance of Enterprise edition or Developer edition of SQL Server 2008 / R2, you can download it from here . This is a trial version.
1) Launch SQL Server Management Studio and connect to the local instance of SQL Server 2008/R2 Enterprise or Developer edition.
We need a database as well. I will use the Northwind database. If you need the installation scripts for the sample Northwind database, click here
2)Let’s find all the server principals on this server/machine.
USE Northwind
GO

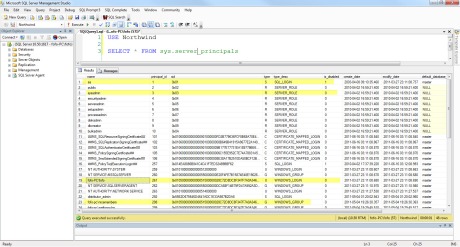
SELECT * FROM sys.server_principals
Run the query and see the results.In my case I see the following
You can see the various server principals, the sid, the type of login and if it is enabled or disabled.
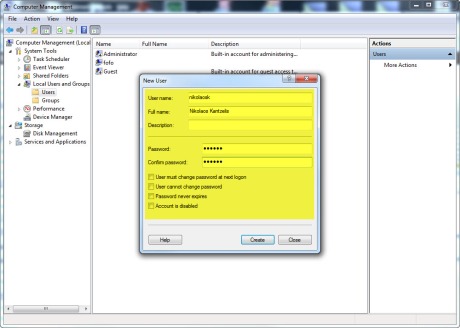
3) Now le’ts see how to create a windows login. We need to create a windows user first. Right-click on Computer icon on the desktop and then select Manage, expand Local Users and Groups and then create New User.I create a windows user named “nikolaosk”. Have a look at the picture below.
We need to write some T-SQL code to create a windows login from the windows user.
CREATE LOGIN [fofo-pc\nikolaosk] FROM WINDOWS
SELECT * FROM sys.server_principals
Run the query and see the results.You will see the new windows login created.
4) Now we will see how to create an SQL Server Login.
CREATE LOGIN SqlLogin WITH PASSWORD='!@#$%^&1a'
SELECT * FROM sys.server_principals
Run the query and see the results.You will see the new SQL Login created.
5) Now let’s have a look on database principals. We need to create a user based on a login that we created previously on the server.
CREATE USER [fofo-pc\nikolaosk]
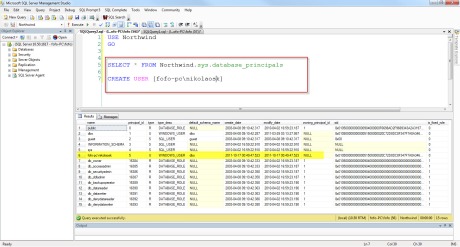
SELECT * FROM Northwind.sys.database_principals
Run the query and see the results.You will see the new user created. Have a look at the picture below
6) Now let’s have a look on the sids for the user and login ‘fofo-pc\nikolaosk’
SELECT sid FROM Northwind.sys.database_principals WHERE name ='fofo-pc\nikolaosk'

--0x01050000000000051500000020C72D8DC8F347F7A0A346D31F040000

SELECT sid FROM sys.server_principals WHERE name ='fofo-pc\nikolaosk'

--0x01050000000000051500000020C72D8DC8F347F7A0A346D31F040000
Run the query and see the results. You will see that the sids are the same. I am sure you can see now how the user and the login is linked.
7) Now let’s create another user based on that windows login.But this time we will use an alias-different name and not the previous name [fofo-pc\nikolaosk]
USE Northwing
GO

DROP USER [fofo-pc\nikolaosk]

CREATE USER nikolaosk FROM login [fofo-pc\nikolaosk]

SELECT * FROM Northwind.sys.database_principals
Run the query and see the results.Now you have your new database user.
8) Now let’s create another user for the Northwind database that is not based on a login. You can also do that.Then I just delete this user.
USE Northwind
GO

CREATE USER withoutlogin WITHOUT LOGIN
go

DROP USER withoutlogin
go
Run the query and see the results.
9) Now let’s create a user defined database role. It is another entry sys.database_principals
USE Northwind
GO

CREATE ROLE myrole
SELECT * FROM Northwind.sys.database_principals
Run the query and see the results.Now you have a new role.
Now that we know how to create server and database principals,let’s see how to authorise those principals to actually use SQL Server.
You must understand that Authorisation in SQL Server is a very fine-grained process. That means I can say for example
- Nikos (a windows login principal) can do anything on the server.
- Nikos (a windows login principal) can do anything on a database.
- Nikos (a windows login principal) can use “SELECT” statements on 5 tables in the database.
- Nikos (a windows login principal) can use “SELECT” statement on only one table of the database.
So a permission is applied on object to a Principal.
10) Now that we will create a new windows user (as in step 3) and then create a login from that user. Then we will create a database user based on that login.So we create a windows user called “jane”.
Run the code below to create a login and a user based on that login.
USE Northwind
GO

CREATE LOGIN [fofo-pc\jane] FROM WINDOWS

CREATE USER jane FROM login [fofo-pc\jane]
If you want to use Windows Authentication in the Microsoft SQL Server Management Studio to connect to a Microsoft SQL Server in an other domain or with an other username (“jane” in this case), you can use the RUN AS command in Windows. Just open a command prompt window and type:
runas /user:jane “C:\Program Files (x86)\Microsoft SQL Server\100\Tools\Binn\VSShell\Common7\IDE\Ssms.exe”
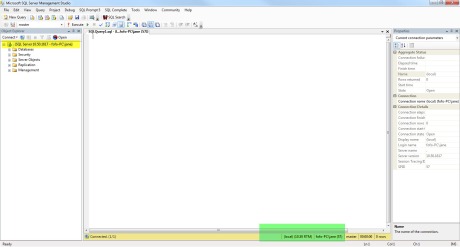
You will be prompted for the password.After you type the password, a new SSMS instance will launch as user “jane”. Have a look at the picture below.
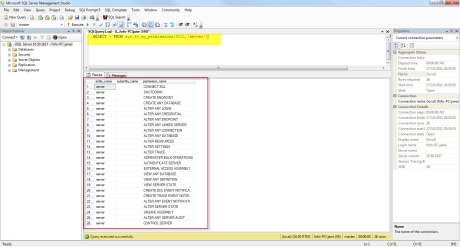
11) In the new query window (you are always logged in as Jane) try to do something in the Northwind database, like select from a table or a view. Try to create a new database. You will fail.That is because the user-jane is authenticated but has no permissions / not authorised to do anything.If you want to check out what you can do as a user connected to an SQL Server instance (at the server level) type the following.
SELECT * FROM sys.fn_my_permissions(NULL,'server')
As it was expected, the only “permission” I have as user jane is basically to connect to SQL Server and view the databases.
12) Now let’s move back to the SSMS (the one instance that I run as admin) and let’s give user “jane” some permissions.This is how I do it. I use the “GRANT” T-SQL statement.
GRANT CONTROL SERVER TO [fofo-pc\jane]
In a command prompt type again
runas /user:jane “C:\Program Files (x86)\Microsoft SQL Server\100\Tools\Binn\VSShell\Common7\IDE\Ssms.exe”
Then type the password.
In the new SSMS application (running as jane), in a new query window type again
SELECT * FROM sys.fn_my_permissions(NULL,'server')
When you execute the query you will get similar results like the picture below.
So we can see that we can have a simple windows user/jane that is not a member of the Windows Admin Group, but at the same time is “almost” a server admin in the SQL Server instance.
13) Managing permissions on individual principals can be difficult and not practical.Windows group/database role is a principal.It is much easier to manage users in group roles.However a user can belong to one or more roles. Those roles can have different permissions set on the user.Sometimes these permissionsa can be conflicting.Try to avoid that.
Now le’ts see how to create a windows user ( as in step 3). We need to create a windows user first. Right-click on Computer icon on the desktop and then select Manage, expand Local Users and Groups and then create New User. Create 2 new users, Aidan and Ale.Create the logins and users.
USE Northwind
go

CREATE LOGIN [fofo-pc\Ale] FROM WINDOWS

CREATE USER Ale FROM LOGIN [fofo-pc\Ale]

CREATE LOGIN [fofo-pc\Aidan] FROM WINDOWS

CREATE USER Aidan FROM LOGIN [fofo-pc\Aidan]
Le’ts see how to create a windows group. We need to create a windows user first. Right-click on Computer icon on the desktop and then select Manage, expand Local Users and Groups and then click on Groups. Create a new Group and name it ITPeople. Add the users Aidan and Ale as members of that group.
Now let’s create a login for the windows group(we are logged in as sysadmin).After that we will create a user for that login.Execute the following query.
USE Northwind
go

CREATE LOGIN [fofo-pc\ITPeople] FROM WINDOWS

CREATE USER ITPeople FROM LOGIN [fofo-pc\ITPeople]

SELECT * FROM sys.database_principals
Now we want to grant SELECT permissions on the table Categories of the Northwinddatabase, to everyone who is a member of ITPeople principal. That means Ale and Aidan since they are members of that principal can also use “Select” statements.
USE Northwind
go

GRANT SELECT ON OBJECT::dbo.Categories TO ITPeople
Now let’s find out if they indeed have the “Select” permission on the Categories table.
USE Northwind
go

SETUSER 'Aidan'

SELECT * FROM dbo.Categories

SETUSER

SETUSER 'Ale'

SELECT * FROM dbo.Categories
SETUSER
Run the query above and you will see that you will succeed. I use the SETUSER statement which allows a member of the sysadmin fixed server role or db_owner fixed database role to impersonate another user.
14) Now let’s create a database role.This is the same as window groups more or less. That means that we have a database role. We give permissions to that role and then all the users/members of that role inherit those permission.In the following T-SQL statements, I create a role, I add Ale and Aidan on this role and grant on this role permissions to do “Insert” statements on the Categories table.
USE Northwind
go

CREATE ROLE myrole

sp_addrolemember 'myrole','Ale'

sp_addrolemember 'myrole','Aidan'

GRANT INSERT ON OBJECT::dbo.Categories TO myrole
Execute the query above and see the results.
Now let’s find out if the users Ale and Aidan of the myrole group can indeed perform INSERT statements on the Categories table.
USE Northwind
go

SETUSER 'Ale'

INSERT INTO dbo.Categories
( CategoryName ,
Description ,
Picture
)
VALUES  ( N'Myfood' , -- CategoryName - nvarchar(15)
NULL , -- Description - ntext
NULL  -- Picture - image
)

SETUSER

SETUSER 'Aidan'

INSERT INTO dbo.Categories
( CategoryName ,
Description ,
Picture
)
VALUES  ( N'Mynicefood' , -- CategoryName - nvarchar(15)
NULL , -- Description - ntext
NULL  -- Picture - image
)

SETUSER
If you run the statements above you will succeed. That means Ale and Aidan are members of this role (myrole) and they have INSERT permissions on Categories table. They are also members of the ITPeople (windows group) and they have SELECT permissions on Categories table.
15) Let’s move on with our security examples and see how we can use Schemas in our security context. Schemas is a set of database objects and it the third element when naming fully a database object e.g MyServer.MyDB.MySchema.MyTable.A schema is a container of objects in a database and it is similar to a namespace in c#
Every object (table,view) belongs to only one schema. Have a look here for more information on schemas.
Let’s create a schema and its relevant objects.Execute the code below to create the schema and the two tables.
USE Northwind
GO

CREATE SCHEMA football

CREATE TABLE footballer
(
id INT PRIMARY KEY,
NAME VARCHAR(50),
AGE INT

)

CREATE TABLE FootballTeam
(
fid INT PRIMARY KEY,
NAME VARCHAR(50),
DATEFOUNDED DATE
)
Now le’ts create 2 more windows users (as in step 3). Right-click on Computer icon on the desktop and then select Manage, expand Local Users and Groups and then create New User. Create 2 new users, Michael and Steven.Create the logins and users.
USE Northwind
go

CREATE LOGIN [fofo-pc\Michael] FROM WINDOWS

CREATE USER Michael FROM LOGIN [fofo-pc\Michael]

CREATE LOGIN [fofo-pc\Steven] FROM WINDOWS

CREATE USER Steven FROM LOGIN [fofo-pc\Steven]
Now, let’s assume that we want the user Steven to have SELECT permissions on the schema.I am sure you are beginning to realise what schemas offer us when it comes to security. Imagine that we have 20 tables in a database. Imagine that we wanted to grant SELECT permissions on 18 of them to a particular principal. We had to do it sepereately (different T-SQL statements) for each table.By using schemas, we could grant SELECT on the schema (all 20 tables belong to one schema) to the user and then DENY SELECT for those 2 tables for the user.
In my case I can grant SELECT permissions on the schema (football) for that particular principal(Steven).
Execute the code below(lines 1-9 first). You will see that I grant the permissions for the schema to the user (line1) and then impersonate that user(line 3).
Then I check that indeed I am the user Steven (line 5).
Then I use the SELECT statement on both tables of the schema (lines 7 & 9)
That will succeed.
Now execute lines (13 to 25). In line 13 I revert to the use dbo. Then I impersonate the user Michael (line 17) and then I I use the SELECT statement on both tables of the schema (lines 22 and 25).
That will fail, since Michael has no permissions on the schema.
GRANT SELECT ON SCHEMA::football TO Steven

EXECUTE AS USER = 'Steven'

SELECT USER

SELECT * FROM football.footballer

SELECT * FROM football.FootballTeam

-- this will revert to the dbo user

REVERT

SELECT USER

EXECUTE AS USER ='Michael'

--check indeed that I am user Michael
SELECT USER

--this will fail
SELECT * FROM football.footballer

SELECT * FROM football.FootballTeam
16) Let’s see some examples on security and fixed server roles/database roles. A role has permissions for particular kind of tasks. Principal assumes of role they are assigned to. There are several fixed server roles that each one has permissions to perform server related tasks.Later on we will look into database roles. Please note that we cannot create server roles but we can create user defined database roles.
Execute the code below.You will see what the fixed server roles are and what kind of permissions are attached to the “serveradmin” and “dbcreator” fixed server roles.
sp_HELPSRVROLE

SP_SRVROLEPERMISSION 'serveradmin'

SP_SRVROLEPERMISSION 'dbcreator'
We can add a login to a fixed server role.We had two logins created previously.Let’s add Michael to the sysadmin fixed server role.
--find out what are the principals that are members of the sysadmin role.
sp_helpsrvrolemember 'sysadmin'

--Add Michael to the sysadmin role

sp_addsrvrolemember 'fofo-pc\Michael','sysadmin'
Let’s test that Michael is indeed added to the sysadmin fixed server role.
In a command prompt type
runas /user:michael “C:\Program Files (x86)\Microsoft SQL Server\100\Tools\Binn\VSShell\Common7\IDE\Ssms.exe”
Then type the password. That will launch a new instance of the SSMS window. In the new query window, type
SELECT * FROM sys.fn_my_permissions(NULL,'server')
You will see beyond doubt that Michael is a member of the sysadmin role.Close SSMS ( the one logged in as Michael) and switch back to the other instance of SSMS running.
Now, you may want to drop Michael from the sysadmin role.Execute the code below.
sp_dropsrvrolemember 'fofo-pc\Michael','sysadmin'
17) We will look into fixed database roles and user defined database roles. Now we want to add Michael to a fixed database role. Please note that Michael is also a user in the database Northwind, and not just a login.
We find out first what the fixed database roles are. Then we find out that Michael does not have SELECT permissions on any table of the database.
We add Michael to the fixed role of db_datareader and try again to select data from the tables of the database. This time we are successful.Members of the db_datareader fixed database role can run a SELECT statement against any table or view in the database.
Execute the code below.
USE Northwind
GO

SELECT * FROM Northwind.sys.database_principals

-- what the db fixed roles are

sp_helpdbfixedrole

--impersonate the user Michael

EXECUTE AS USER ='Michael'

SELECT USER

--this will fail

SELECT * FROM dbo.Categories

--this will fail

SELECT * FROM dbo.Shippers

--revert back to sysadmin so I can add Michael to the db_datareader role
REVERT

--add Michael to the db_datareader role

sp_addrolemember 'db_datareader','Michael'

--impersonate the user Michael

EXECUTE AS USER ='Michael'

SELECT USER

--this will succeed

SELECT * FROM dbo.Categories

--this will succeed

SELECT * FROM dbo.Shippers

--this will succeed
SELECT * FROM football.footballer
Now we want to restrict user Michael from selecting (tables & views) belonging to the football schema in the Northwind database.Execute the code below.
--this will fail

DENY SELECT ON SCHEMA::football TO db_datareader
This will fail. We cannot deny permissions from a fixed database server role. What we can do is deny permissions on the schema to the particular user.Execute the code below.
USE Northwind
GO

DENY SELECT ON SCHEMA::football TO Michael

EXECUTE AS USER ='Michael'

SELECT USER

--this will now fail
SELECT * FROM football.footballer
Finally we will drop Michael from the fixed database role db_datareader.Execute the code below.
USE Northwind

go

sp_droprolemember 'db_datareader','Michael'

EXECUTE AS USER ='Michael'

SELECT USER

--this will fail

SELECT * FROM dbo.Categories

--this will fail

SELECT * FROM dbo.Shippers

--this will fail
SELECT * FROM football.footballer
Now Michael does not have any SELECT permissions on the tables/views of the Northwind database.
18) Now we will add a new user to a user defined database role. Right-click on Computer icon on the desktop and then select Manage, expand Local Users and Groups and then create New User. Create ne new users, Meryl.Create the login and user.Execute the code below.
USE Northwind
go

CREATE LOGIN [fofo-pc\Meryl] FROM WINDOWS

CREATE USER Meryl FROM LOGIN [fofo-pc\Meryl]
Obviously we could assign SELECT permissions to the schema football to user Meryl ( as we did in another example previously) but this time we want to do it through a user defined database role.Execute the code below.I create a role and assign to it SELECT permissions on the football schema.Execute the code below. I check to see that Meryl does not have SELECT permissions on the schema.Then I create a role and give permissions to that role. Then I add Meryl to that role. Meryl assumes the permissions of that role.Then I run the SELECT statements again against the two tables that belong to the football schema.
USE Northwind
go

EXECUTE AS USER ='Meryl'

SELECT USER

--this will fail

SELECT * FROM football.footballer

--this will fail

SELECT * FROM football.footballteam

--revert to dbo

REVERT

--create role

CREATE ROLE football_reader

--grant permissions on role
GRANT SELECT ON SCHEMA::football TO football_reader

--add user to the role
sp_addrolemember 'football_reader','Meryl'

EXECUTE AS USER ='Meryl'

SELECT USER

--this will succeed

SELECT * FROM football.footballer

--this will succeed

SELECT * FROM football.footballteam
19)Ιn this example I would like to talk a bit about conflicting permissions.What happens when a user is in a role (like Meryl above) that has SELECT rights on the schema football and at the same time is a member of another role that has no SELECT rights on that schema? We have a conflict. We will execute the code below and we will find out.
USE Northwind
GO

CREATE ROLE no_football_reader

--deny permissions on role

DENY SELECT ON SCHEMA::football TO no_football_reader

--add user to the role
sp_addrolemember 'no_football_reader','Meryl'

EXECUTE AS USER ='Meryl'

SELECT USER

--this will fail

SELECT * FROM football.footballer

--this will fail

SELECT * FROM football.footballteam
As you will find out when you execute the code, the user Meryl cannot perform SELECT statements on the schema football.So DENY overwrites\takes precedence over the GRANT statement.
In all these samples I have adopted the T-SQL approach. You could do all the above with the GUI of SSMS.
Remember your system is as secure as your weakest component.Also keep in mind that threats are broad and varied.
I do not want to say that everyone is your enemy but sometimes it helps to think pessimistically.
That is all folks.
Hope it helps!!!


[…] of Security in SQL Server .Then I will provide many examples on how to secure data in SQL Server. (read more) Share Posted: Σάββατο, 22 Οκτωβρίου 2011 5:57 μμ από το μέλος […]