An introduction to ChatGPT December 11, 2023
Posted by fofo in ChatGPT, Generative AI.Tags: chatbot, ChatGPT, ChatGPT APIs, ChatGPT plugins, language model
add a comment

Artificial intelligence (AI) is changing our world quickly, especially in making software. AI tools are making it easier and better for people to create software.
I’ve been in the tech world for nearly 25 years and have been witnessing some amazing stuff. It is really mind-blowing what is happening right now with artificial intelligence and machine learning, especially with ChatGPT. In this post we will look into ChatGPT and generative AI.
ChatGPT is a true paradigm shift, like when the internet first emerged. It has been the talk of the town so to speak and there is sparking interest from investors and tech companies around the globe. It is already used by millions much to the surprise of its creators at OpenAI. It took just 2 months to reach 100 million users. It draws almost 1.5 billion visits per month.
In short, ChatGPT is a smart chatbot that’s really good at making human-like conversation. It’s a type of AI that creates new stuff, just like those tools that make new pictures or music. It’s become super popular really fast and is changing how we work, learn, and chat.
I will explain how it can be used in the real world, offering handy insights for software engineers and developers. You do not need to have any previous experience to follow this post. I hope that you will learn how to leverage this brilliant new technology to make your work/life easier.
Let’s start by explaining what Generative AI or Gen AI in short, is.
You can think of it like a creative AI that can create all sorts of new things like text, pictures, videos, tunes, or even computer code. It can create digital content on the spot.
There are various types of AI. Another type of AI, called discriminative AI.
Discriminative AI, also known as a discriminative model in the context of machine learning, is a type of model that focuses on distinguishing between different kinds of data inputs. It learns the boundaries between different categories or classes in a dataset. Discriminative models differ from generative models in that they do not focus on how data is generated. While generative models can create new data instances, discriminative models are solely concerned with learning the distinction between existing data categories.
In summary, discriminative AI models are powerful tools in machine learning for classifying and distinguishing between different types of data, making them essential in many practical applications where accurate categorization is critical.
Let’s get back to Gen AI.
There is a tool created by OpenAI, called DALL-E. DALL-E is an artificial intelligence program,specialised in generating images from textual descriptions. It’s named as a playful combination of the famous surrealist artist Salvador Dalí and the Pixar movie character WALL-E. You can supply this tool with the following description for an image “A developer sitting in his desk typing some code in his laptop wearing a nice t-shirt” and you will get back a brilliant image generated by this handy tool.
There are several key aspects of Generative AI:
- Machine Learning Models: Generative AI typically involves machine learning models like neural networks. These models are trained on large datasets and learn to recognize patterns, styles, and structures within this data.
- Data-Driven Creativity: The AI uses the insights gained from its training data to create new content. For example, after analyzing thousands of paintings, a generative AI model could create new images in the style of the observed artworks.
- Diverse Applications: Generative AI can be used in various fields, such as creating realistic computer graphics, generating text for chatbots, composing music, synthesizing human-like speech, and more.
- Deep Learning Techniques: Techniques like Generative Adversarial Networks (GANs) and transformers are commonly used. GANs, for instance, involve two neural networks—the generator and the discriminator—working in tandem to produce increasingly refined outputs.
- Ethical and Creative Implications: As Generative AI becomes more sophisticated, it raises questions about originality, copyright, and the role of AI in creative processes. It also poses challenges in areas like misinformation and deepfakes.
Overall, Generative AI represents a significant advancement in the field of artificial intelligence, offering new possibilities for automation and creativity.
One might ask “So how does ChatGPT know so much?”Well, the short answer is, that has been trained on tons of information from the internet – news, research papers, books, websites like Wikipedia, and more. I should highlight the fact that ChatGPT doesn’t look stuff up online when you ask a question. It uses what it’s already learned to make guesses about what comes next. It’s not a search engine, but if you ask me, it will replace search engines soon.
The obvious question, is “How do I chat with ChatGPT?”
Just, browse to chat.openai.com. You need to create an account. Do not worry it is free! You can also download the OpenAI apps for Android and iOS users.
There’s a free version of ChatGPT that everyone can use. It’s got all the cool features, although it’s currently on version 3.5. Sometimes it might be a bit slow when lots of people are using it. If it’s taking a bit longer, just hang tight for a moment, or try refreshing the page.
There’s also ChatGPT Plus! It costs $20 a month, and you get quicker responses, even when it’s busy. You will also get all the new features, including the latest GPT- 4 version.
Let’s explore what ChatGPT can do. ChatGPT can have conversations and remember things within them. We can also give it feedback to make it even better. It has some new features like browsing with Bing and using plugins. Let’s do a quick demo.
I navigate at chat.openai.com and log in.
I’m using the ChatGPT Plus account, which as I said costs $20 per month. With Plus subscription, I can pick between the GPT-3.5 model, which is awesome for most things, or the latest GPT-4. I am going to use GPT-4.
ChatGPT-4 was released on March 14, 2023. It has 175 billion parameters and receives 10 million queries per day. It was trained on a massive corpus of text data, around 570GB of datasets, including web pages, books, and other sources.
This my request/prompt to ChatGPT -> “I would like to apply to a top university in USA for a Master’s degree in Computer Science with a focus in Artificial Intelligence and Machine Learning.”
This is the reply I got from the chatbot.
—————————————————————————————————————-
Applying for a Master’s degree in Computer Science with a specialization in Artificial Intelligence and Machine Learning at a top university in the USA is an exciting goal! Here are some steps and tips to help you with the application process:
- Research Universities: Start by researching which universities offer strong programs in your area of interest. Look for programs with a good reputation in AI and Machine Learning, and check their research facilities, faculty expertise, and industry connections.
- Check Admission Requirements: Each university will have its own set of admission requirements. These typically include a relevant undergraduate degree, GRE scores, TOEFL or IELTS scores for non-native English speakers, and sometimes specific prerequisites in mathematics and programming.
- Prepare Your Application:
- Statement of Purpose (SOP): This is a crucial part of your application. Your SOP should clearly articulate your interest in AI and Machine Learning, your academic and professional background, your long-term goals, and why you’re interested in that specific program.
- Letters of Recommendation: Most programs require 2-3 letters of recommendation. Choose recommenders who know you well and can speak to your academic and research abilities, such as professors or employers.
- Resume/CV: Highlight your academic achievements, research projects, relevant work experience, publications, and any other pertinent accomplishments.
- Gather Transcripts and Test Scores: Request transcripts from your undergraduate institution(s), and ensure you have your GRE and TOEFL/IELTS scores ready to submit.
- Apply for Funding: Investigate funding options such as scholarships, research assistantships, teaching assistantships, or fellowships. Some programs offer funding packages to international students, while others require separate applications.
- Write a Research Proposal (if required): Some programs might ask for a research proposal. If so, write a clear and concise proposal that aligns with your interests and the faculty’s research areas.
- Prepare for Interviews: Some programs may conduct interviews as part of the admissions process. Be ready to discuss your academic background, research interests, and why you are a good fit for the program.
- Application Submission: Submit your application before the deadline. It’s wise to apply to multiple universities to increase your chances of acceptance.
- Follow Up: After submitting your applications, keep an eye on your email for interview invitations or additional requests from universities.
- Decision and Acceptance: Once you receive acceptance letters, decide which program best fits your goals and needs. Be mindful of the acceptance deadline.
- Visa and Preparation for Moving: If you’re an international student, you’ll need to apply for a student visa. Start this process as soon as you accept an offer, as it can take time.
Remember, applying to top universities is competitive, so ensure your application is well-prepared and showcases your passion and suitability for the field of AI and Machine Learning. Good luck!
—————————————————————————————————————–
You can see the ChatGPT UI below.

Let’s have a quick look on how to use ChatGPT. When you open it up, you’ll notice on the left side there’s a place where all your chats are listed. If you’re new here, it’ll be empty until you start chatting. To kick off a new chat, just hit the “New Chat” button at the top left corner.
One cool thing about ChatGPT is that it remembers what you’re talking about in each chat session. You can even juggle a few chats on different topics at the same time.
If you are ready to chat, just type what you want to say at the bottom of the page, where it says “Message ChatGPT…” Hit the up-facing arrow or press ENTER to send your message.
If you need to add a new line without sending the message,just press Shift + ENTER. The chat will move up as you go along, but your message box stays put at the bottom. If you’ve scrolled up and want to jump back to the latest in the chat, just click the down arrow key next to the chat, and you’re back in action.
Before creating a new chat, l would like to talk about prompts and their importance.
When you use ChatGPT, you give it a prompt, which is a text that helps the model know what to respond. Think of a prompt as a question or a statement that sets the stage for the model’s reply.
Before the model gets this prompt, the text is split into smaller parts called tokens. Each token is a word or a punctuation mark, and they help the model understand the text’s meaning.
ChatGPT can handle up to 4000 tokens for both the prompt and its response. This means the prompt and the model’s reply each can’t be more than 4000 tokens.
Although 4000 tokens might seem like a lot, this limit can affect how complex your questions or statements to the model can be. For instance, you can’t give the model a whole software application in one prompt because of this token limit.
To make a good prompt, you should be clear and to the point. Tell the model exactly what you want to know and give any important details or limits. A well-made prompt is specific and clear, helping the model give a precise answer. You will come across the term “Prompt Engineering”.
Prompt engineering is the art of crafting effective prompts to guide AI language models like ChatGPT in generating specific and relevant responses. It involves understanding how these models interpret and process language, allowing users to frame their questions or statements in a way that maximizes the accuracy and relevance of the AI’s output. The key lies in being clear, concise and direct in the prompt, providing sufficient context without overloading the model with unnecessary information. This skill becomes crucial in complex scenarios where the desired output is highly specific or when the user seeks creative or technical solutions.
ChatGPT’s ability to handle a wide range of topics and its interactive nature make it an invaluable tool across various fields, from education and customer service to creative writing and technical problem-solving. However, the effectiveness of its application largely depends on the user’s ability to communicate their needs and context through well-thought-out prompts.
Let’s create a new chat with a good prompt. This time we will ask the AI chatbot for a blog post. The prompt is
“I need to create a blog post for an e-commerce site, Buying Guide & Helpful Tips, for children car seats”.
ChatGPT gets back to me with a very detailed response. I can choose to regenerate the response, rate if the second reponse was better than the first one and copy the response to the clipboard.
There are the new GPT-4 features! With a Plus account, you can use Bing for real-time internet searches. Let’s say we ask for today’s Microsoft stock price. GPT-4 with Bing gives us the latest info in a friendly response.
“As of the close of the market, Microsoft Corporation’s (MSFT) stock price was $374.23. This price reflects the value at the end of the trading day.”
Plugins are another cool feature. They let you interact with websites directly from ChatGPT.
We need to install the plugin first. See the image below

We will install the KAYAK plugin to find flights. We just give our travel details, and ChatGPT will do the rest.
Have a look at the image below. Kayak Plugin is installing.

I gave ChatGPT this prompt
“I need to fly from athens to london on the 15th of december. Returning on the 22nd of december back to athens. I need direct flights, preferably evening flights. I will travel alone”
In the image below, you can see the Kayak plugin response. I even get booking links for my flights.

ChatGPT has some limitations. First, the information it uses is not always up-to-date, so it might not know about recent events. However, it’s getting updates over time. Also, it can sometimes give wrong answers that sound right, so you need to double-check what it tells you.
Another thing to remember is how ChatGPT deals with harmful or biased questions. It’s trained on internet data, which can include biased or harmful content. But, it’s designed not to help with illegal or harmful activities. So, if you ask something like that, it won’t give you the answer.
Don’t share personal or sensitive information because it’s not completely private. Also, it’s hard to understand exactly how ChatGPT comes up with its answers, which can raise ethical questions. And, there’s a big question about who owns the information it creates – is it the developers, the users, or someone else?
ChatGPT is a useful tool, but it’s important to use it sensibly. You should always check its answers and be mindful of privacy and ethical issues. Remember, it’s a tool to help you, but it’s not perfect.
Finally let’s look into OpenAI’s APIs. You can access them at platform.openai.com. These APIs let you add cool AI features to your own websites or apps. This isn’t just for ChatGPT, but also for other cool tools like DALL-E for images.
Many popular apps are using these APIs, like GitHub’s Copilot and Duolingo for translating languages. ChatGPT is awesome, but the real magic happens with these APIs. They open up so many possibilities, like creating chatbots for your website or app, or using it as a virtual writing assistant for your customers.
For example, you can ask ChatGPT to draft a friendly cover letter for a senior software developer position, or translate a sentence into Greek. ChatGPT can help with tasks you’d usually Google, like coding syntax or formulas. You could ask ChatGPT on Excel’s HLOOKUP formula.
It’s also handy for extracting key info from documents, like pulling out important details from resumes. And of course, it’s great for writing and refining code in various programming languages, generating test cases and code documentation even helping with debugging or comparing different tech options.
Let’s look into a typical prompt relevant to a programming task.
“Generate code comments for a Java program that implements a database
management system. The comments should describe the purpose and functionality of
each class and method, as well as any relevant design decisions.”
The possibilities are endless, and it’s all about how you choose to use this cool technology in your daily tasks.
I will write a new blog post regarding ChatGPT and development stuff. In the meantime have a look at the OpenAI blog.
Hope it helps!!!
SQL Server 2022 new functions September 17, 2022
Posted by fofo in Sql Server, SQL Server 2022.Tags: sql server 2022 functions, sql server functions
1 comment so far
In this post I am going to look into the new T-SQL functions which are introduced with the SQL Server 2022 version.
You have to install SQL Server 2022 first in your local machine, if you want to follow along.
You must have a machine that has:
At least 2 GB of memory
An internet connection
At least Windows 10 or Windows Server 2016 operating system
You can download SQL Server 2022, here.
You will also need to install a sample database. Please download the AdventureWorks2019 database (AdventureWorks2019.bak).
Launch SSMS and connect to the SQL Server 2022 database instance.
Next, you need to restore the .bak file, so you can work with the AdventureWorks2019.
- After launching SQL Server 2022, I type the statement below in a new query window
SELECT @@VERSION
You will see something like this (if you type the same statement in your machine)
Microsoft SQL Server 2022 (RC0) – 16.0.900.6 (X64)
Aug 20 2022 12:55:47
Copyright (C) 2022 Microsoft Corporation
Enterprise Evaluation Edition (64-bit) on Windows 10 Pro 10.0 (Build 19044: )
I am running an RC0 version of SQL Server 2022.
2. The first new two T-SQL functions that we will investigate are GREATEST & LEAST.
GREATEST() and LEAST() are scalar-valued functions and return the maximum and minimum value, respectively, of a list of one or more expressions. The expression can include a number of columns of a table. Please see the example below. I am using the [Sales].[SalesOrderHeader] table.
SELECT
      [OrderDate]
      ,[DueDate]
      ,[ShipDate]
      ,[ModifiedDate]
	  ,[GREATEST] = GREATEST(OrderDate,DueDate,ShipDate,ModifiedDate)
	  ,[LEAST] = LEAST(OrderDate,DueDate,ShipDate,ModifiedDate)
  FROM [AdventureWorks2019].[Sales].[SalesOrderHeader]
Those functions also work with constants.
Type and execute the statement below
SELECT LEAST ( 9.32, 55, N'70' ) AS LeastVal;
SELECT GREATEST ( 1236.62, 103.14, N'2300' ) AS GreatestVal;
The greatest and minimum values will be displayed in the Results window.
3. The next function is STRING_SPLIT(), a table-valued function, which splits a string into substrings, based on the separator character.It is available in SQL Server 2016 (compatibility level 130) and later but now we have an enhancement.
Type and execute the statement below
SELECT * FROM STRING_SPLIT('SQL Server 2022 rocks', ' ');
the result is
value
SQL
Server
2022
rocks
We have a third optional argument in SQL Server 2022.
The enable_ordinal parameter is a flag to enable\disable the output column – original.
- Value 1: Enable the ordinal column
- Value 0 or NULL: Disable the original column
SELECT * FROM STRING_SPLIT('SQL Server 2022 rocks', ' ', 1);
The result is:
value ordinal
SQL 1
Server 2
2022 3
rocks 4
Ιt splits the strings and adds the column ordinal with their respective string number.
4. The next functions I am going to look into are the trim functions (TRIM(), LTRIM(), RTRIM()). Those functions removed space characters in an expression.
Type and execute the statement below
SELECT LTRIM('      SQL SERVER ROCKS    ');
SELECT RTRIM('      SQL SERVER ROCKS    ');
SELECT TRIM('      SQL SERVER ROCKS    ');
Have a look at the results
The first statement removes leading spaces at the beginning of a string. The second statement removes spaces at the end of a string. The third statement removes all spaces at the beginning and end of a string.
We do have some enhancements in the RC0 version.Now we can remove a specified number of characters from the beginning or end of a string.
Type and execute the following statements:
SELECT LTRIM('2022SQL SERVER ROCKS2022' , '2022');
SELECT RTRIM('2022SQL SERVER ROCKS2022' , '2022');
The results are:
SQL SERVER ROCKS2022
2022SQL SERVER ROCKS
Type and execute the following statement:
SELECT TRIM( '2022' FROM '2022SQLSERVERROCKS2022') AS Result;
The result is:
SQLSERVERROCKS
5. We will look now into the LEADING, TRAILING, BOTH keywords. We have to set the compatibility level of the database to 160. Type and execute the statements below
SELECT compatibility_level
FROM sys.databases WHERE name = 'AdventureWorks2019';
GO


ALTER DATABASE AdventureWorks2019
SET COMPATIBILITY_LEVEL = 160;
GO
LEADING removes characters specified from the start of a string.
TRAILING removes characters specified from the end of a string.
BOTH (default positional behavior) removes characters specified from the start and end of a string.
Type and execute the statements below:
SELECT TRIM(LEADING '2022' FROM '2022SQLSERVERROCKS2022') AS Result;

SELECT TRIM(TRAILING '2022' FROM '2022SQLSERVERROCKS2022') AS Result;

SELECT TRIM(BOTH '2022' FROM '2022SQLSERVERROCKS2022') AS Result;
The results are:
SQLSERVERROCKS2022
2022SQLSERVERROCKS
SQLSERVERROCKS
Type and execute the statements below:
SELECT TRIM(LEADING '2022123' FROM '2022SQLSERVERROCKS2022123') AS Result;

SELECT TRIM(TRAILING '2022123' FROM '2022SQLSERVERROCKS2022123') AS Result;

SELECT TRIM(BOTH '2022123' FROM '2022SQLSERVERROCKS2022123') AS Result;
We can specify the characters that we need trimmed. It will trim those characters when it finds them in the specified string.
The results are:
SQLSERVERROCKS2022123
2022SQLSERVERROCKS
SQLSERVERROCKS
6. The next function is DATETRUNC function.
The syntax is like this DATETRUNC(datepart,date). Returns a date truncated to a specified datepart.
The datepart specifies the precision for truncation.
Type and execute the statements below:
DECLARE @mydate datetime2 = GETDATE()
SELECT 'Year', DATETRUNC(year, @mydate);
SELECT 'Quarter', DATETRUNC(quarter, @mydate);
SELECT 'Month', DATETRUNC(month, @mydate);
SELECT 'Week', DATETRUNC(week, @mydate);
SELECT 'Day', DATETRUNC(day, @mydate);
SELECT 'Hour', DATETRUNC(hour, @mydate);
SELECT 'Minute', DATETRUNC(minute, @mydate);
SELECT 'Second', DATETRUNC(second, @mydate);
SELECT 'Millisecond', DATETRUNC(millisecond, @mydate);
SELECT 'Microsecond', DATETRUNC(microsecond, @mydate);
The results are:
Year 2022-01-01 00:00:00.0000000
Quarter 2022-07-01 00:00:00.0000000
Month 2022-09-01 00:00:00.0000000
Week 2022-09-11 00:00:00.0000000
Day 2022-09-17 00:00:00.0000000
Hour 2022-09-17 18:00:00.0000000
Minute 2022-09-17 18:17:00.0000000
Second 2022-09-17 18:17:04.0000000
Millisecond 2022-09-17 18:17:04.0700000
Microsecond 2022-09-17 18:17:04.0700000
7. The next function is DATE_BUCKET().
The function is defined -> DATE_BUCKET (datepart, number, date, origin)
Datepart:week,day,year,hour,month,day
Number: we can change the bucket size with a number. Putting 3 for example when the datepart is month, means that we want to change the bucket size to 3 months
Date: the actual date e.g a datetime column
Origin:origin is optional. You can force SQL Server to start from a custom date if you want.
I want to see the number of customers and subtotal (sales)for each week from my SalesOrderHeader table.
Type and execute the statements below:
SELECT DATE_BUCKET(week, 1, orderdate) AS SalesPerWeek,SUM(SubTotal) AS SubTotalPerWeek,
       COUNT(CustomerID) AS NumOfCustomers
FROM [AdventureWorks2019].[Sales].[
GROUP BY DATE_BUCKET(WEEK, 1, orderDate)
ORDER BY SalesPerWeek;
The results are (top 10) are the following
SalesPerWeek SubTotalPerWeek NumOfCustomers
2011-05-30 00:00:00.000 569231.4133 63
2011-06-06 00:00:00.000 82782.0064 25
2011-06-13 00:00:00.000 108503.9946 33
2011-06-20 00:00:00.000 135311.3764 40
2011-06-27 00:00:00.000 1645153.0514 110
2011-07-04 00:00:00.000 119199.7828 37
2011-07-11 00:00:00.000 90295.1064 27
2011-07-18 00:00:00.000 144846.771 45
2011-07-25 00:00:00.000 111993.2428 35
2011-08-01 00:00:00.000 1296455.5324 99
Hope it helps!!!!
Create an ASP.Net Core Web API with EF Core July 17, 2022
Posted by fofo in ASP.Net Core, Entity Framework Core, SQL Server 2019, Visual Studio 2019.Tags: dependency injection, wep api
add a comment
In this post I am going to create a simple ASP.Net Core API application using EF Core. I am going to use the EF Core Code First paradigm. I am going to create a simple entity e.g Doctor and perform simple CRUD operations on that entity.
I am using Microsoft Visual Studio Enterprise 2019. You can also use Visual Studio Community edition 2019 or 2022 or any other latest edition of Visual Studio. You can find the relevant downloads here.
I am also using MS SQL Server 2019 Express edition. You can download it here . You can use any other edition or version (e.g MS SQL Server 2017 Express edition, MS SQL 2019 Developer edition e.t.c).
1) We need to create a new project. Do launch Visual Studio and create a new project -> an Asp.Net Core Web API -> see the image below. Click on the image to enlarge.

2) Click Next in the wizzard. Now you need to type the Project Name and the project location. Then click Next in the wirzzard. See the image below. Click on the image to enlarge it
3) In this next step of the wizzard, we need to specify the following:
3.1 Target Framework -> .NET 5.0 Current
3.2 Authentication Type: None
3.3 Configure for HTTPS: checked
3.4 Enable Open API Support: I am going to use Swagger so I check this box. See the image below and click to enlarge it.
4) Now we have the project structure, out of the box. We need to add Entity Framework in the project. We will right click on the project name and click on Manage Nuget Packages…
We need to install the following:
- Microsoft.EntityFrameworkCore.SqlServer -> Interacts with SQL Server from our .Net Core application.
- Microsoft.EntityFrameworkCore.Tools -> This package is contains commands about migrations
- Microsoft.Extensions.Configuration -> We can read data from setting files.
5) We need to add a new folder in our solution. I will call it Models (Right click on project name, then click on Add then click on New Folder and call it Models) and I will add classes in it that represent the entity class and other classes. We will create an entity class, a poco class, Doctor.
Right-click in this folder (Models) then Add then Class-> name it Doctor.cs
The code follows:
   public class Doctor
    {


        [Key]
        public int DoctorId
        {
            get;
            set;
        }
        public string FirstName
        {
            get;
            set;
        }
        public string LastName
        {
            get;
            set;
        }
        public decimal Salary
        {
            get;
            set;
        }
        public string Specialty
        {
            get;
            set;
        }
    }
I create a Doctor class with the necessary fields. The key attribute defines that we use this column as the primary key.
5.1 We need to create a context class which will “talk with” SQL Server. Add a new class in your Models folder and add constructor and Doctor DbSet. The code follows:
    public class DocContext : DbContext
    {
        public DocContext(DbContextOptions options) : base(options) { }


        DbSet<Doctor> Doctors
            {
            get;
            set;
        }
    }
5.2 Now we need to connect to the SQL Server (data store). We create a connection string in the appsettings.json file.
The code follows:
{
  "Logging": {
    "LogLevel": {
      "Default": "Information",
      "Microsoft": "Warning",
      "Microsoft.Hosting.Lifetime": "Information"
    }
  },
  "AllowedHosts": "*",
  "ConnectionStrings": {

    "DbStr": "Server=.;Database=DoctorsDBNew;MultipleActiveResultSets=True;Trusted_Connection=True;"
  }
}
I use the local instance of SQL Server (.) and the database name is DoctorsDBNew. You can use you own name for the database.
If the database does not exist then it will be generated automatically. I use windows authentication to connect to the SQL Server instance.
Please configure your connection string accordingly.
6. Now we have to add DbContext in our startup file. Open Startup.cs file and add the following code in the ConfigureServices method.
services.AddDbContext<DocContext>(x => x.UseSqlServer(Configuration.GetConnectionString("DbStr")));
In ConfigureServices Method, we add our DocContext class and pass th connection string in it by getting from our appsetting file using Configure.GetConnectionString() method.
7. We now open, the Package Manager Console by click on the menu Tools, then NuGet Package Manager then Package Manager Console.
Add the following command.
Add-Migration First
First is our name of migration, you can give as per your choice. Hit enter.
As you can see in your solution a new folder named Migration is created. There are two files. One is 20220621150551_First.cs and the other is 20220621150551_First.Designer.cs
Please see the image below

The contents of the file, 20220621150551_First.cs follow:
using Microsoft.EntityFrameworkCore.Migrations;

namespace ASPNetCoreApiCrudDemoNew.Migrations
{
    public partial class First : Migration
    {
        protected override void Up(MigrationBuilder migrationBuilder)
        {
            migrationBuilder.CreateTable(
                name: "Doctors",
                columns: table => new
                {
                    DoctorId = table.Column<int>(type: "int", nullable: false)
                        .Annotation("SqlServer:Identity", "1, 1"),
                    FirstName = table.Column<string>(type: "nvarchar(max)", nullable: true),
                    LastName = table.Column<string>(type: "nvarchar(max)", nullable: true),
                    Salary = table.Column<decimal>(type: "decimal(18,2)", nullable: false),
                    Specialty = table.Column<string>(type: "nvarchar(max)", nullable: true)
                },
                constraints: table =>
                {
                    table.PrimaryKey("PK_Doctors", x => x.DoctorId);
                });
        }

        protected override void Down(MigrationBuilder migrationBuilder)
        {
            migrationBuilder.DropTable(
                name: "Doctors");
        }
    }
}
When the code above executes, it will generate a new database and new table called Doctors.
In the Package Manager Console type
Update-Database
8) If you launch now SQL Server Management Studio, you will see that the database DoctorsDBNew is created.
The Doctors table is also created with the same fields as we have added in our model.
Please see the image below

9) The next step is to create a new response Model. We need to send data back to the user for save and delete operations. We are going to create a new folder called ViewModels. We are going to add a new class, ResponseModel. The code follows:
public class ResponseModel
    {
        public bool IsSuccess
        {
            get;
            set;
        }
        public string Messsage
        {
            get;
            set;
        }
    }
10) We are going to create a new folder in the solution, Services.
We are going to create a repository class to interact with the database. We are going to create the IDoctorService.cs. The code follows:
public interface IDoctorService
    {

        /// <summary>
        /// get list of all doctors
        /// </summary>
        /// <returns></returns>
        List<Doctor> GetDoctorsList();

        /// <summary>
        /// get Doctor details by Doctor id
        /// </summary>
        /// <param name="DoctorId"></param>
        /// <returns></returns>
        Doctor GetDoctorDetailsById(int DoctorId);

        /// <summary>
        ///  add edit Doctor
        /// </summary>
        /// <param name="DoctorModel"></param>
        /// <returns></returns>
        ResponseModel SaveDoctor(Doctor DoctorModel);


        /// <summary>
        /// delete Doctors
        /// </summary>
        /// <param name="DoctorId"></param>
        /// <returns></returns>
        ResponseModel DeleteDoctor(int DoctorId);


    }
11) We are going to create a class to implement the interface. The code follows:
public class DoctorService:IDoctorService
    {

            private DocContext _context;
            public DoctorService(DocContext context)
            {
                _context = context;
            }

            /// <summary>
            /// get list of all doctors
            /// </summary>
            /// <returns></returns>
            public List<Doctor> GetDoctorsList()
            {
                List<Doctor> docList;
                try
                {
                    docList = _context.Set<Doctor>().ToList();
                }
                catch (Exception)
                {
                    throw;
                }
                return docList;
            }


            /// <summary>
            /// get doctors details by id
            /// </summary>
            /// <param name="docId"></param>
            /// <returns></returns>
            public Doctor GetDoctorDetailsById(int docId)
            {
                Doctor doc;
                try
                {
                    doc = _context.Find<Doctor>(docId);
                }
                catch (Exception)
                {
                    throw;
                }
                return doc;
            }


            /// <summary>
            ///  add edit doctor
            /// </summary>
            /// <param name="doctorModel"></param>
            /// <returns></returns>
            public ResponseModel SaveDoctor(Doctor doctorModel)
            {
                ResponseModel model = new ResponseModel();
                try
                {
                    Doctor _temp = GetDoctorDetailsById(doctorModel.DoctorId);
                    if (_temp != null)
                    {

                        _temp.FirstName = doctorModel.FirstName;
                        _temp.LastName = doctorModel.LastName;
                        _temp.Salary = doctorModel.Salary;
                        _temp.Specialty = doctorModel.Specialty;
                        _context.Update<Doctor>(_temp);
                        model.Messsage = "Doctor Update Successfully";
                    }
                    else
                    {
                        _context.Add<Doctor>(doctorModel);
                        model.Messsage = "Doctor Inserted Successfully";
                    }
                    _context.SaveChanges();
                    model.IsSuccess = true;
                }
                catch (Exception ex)
                {
                    model.IsSuccess = false;
                    model.Messsage = "Error : " + ex.Message;
                }
                return model;
            }

            /// <summary>
            /// delete doctors
            /// </summary>
            /// <param name="docId"></param>
            /// <returns></returns>
            public ResponseModel DeleteDoctor(int docId)
            {
                ResponseModel model = new ResponseModel();
                try
                {
                    Doctor _temp = GetDoctorDetailsById(docId);
                    if (_temp != null)
                    {
                        _context.Remove<Doctor>(_temp);
                        _context.SaveChanges();
                        model.IsSuccess = true;
                        model.Messsage = "Doctor Deleted Successfully";
                    }
                    else
                    {
                        model.IsSuccess = false;
                        model.Messsage = "Doctor Not Found";
                    }

                }
                catch (Exception ex)
                {
                    model.IsSuccess = false;
                    model.Messsage = "Error : " + ex.Message;
                }
                return model;
            }

        }
12) Now we need to open our startup file (Startup.cs) and add the code below in the ConfigurationServices method to add the dependency for our class and interface.
services.AddScoped<IDoctorService, DoctorService>();
13) Now we need to implement the create our Controller. We add a Controller -> API Controller – Empty, by right clicking on the Controllers folder. Give it an appropriate name -> e.g DoctorController.cs
The code follow below:
[Route("api/[controller]")]
    [ApiController]
    public class DoctorController : Controller
    {
        IDoctorService _doctorService;
        public DoctorController(IDoctorService service)
        {
            _doctorService = service;
        }

        /// <summary>
        /// get all doctors
        /// </summary>
        /// <returns></returns>
        [HttpGet]
        [Route("[action]")]
        public IActionResult GetAllDoctors()
        {
            try
            {
                var doctors = _doctorService.GetDoctorsList();
                if (doctors == null)
                    return NotFound();
                return Ok(doctors);
            }
            catch (Exception)
            {
                return BadRequest();
            }
        }


        /// <summary>
        /// get employee details by id
        /// </summary>
        /// <param name="id"></param>
        /// <returns></returns>
        [HttpGet]
        [Route("[action]/id")]
        public IActionResult GetdoctorsById(int id)
        {
            try
            {
                var doctors = _doctorService.GetDoctorDetailsById(id);
                if (doctors == null)
                    return NotFound();
                return Ok(doctors);
            }
            catch (Exception)
            {
                return BadRequest();
            }
        }


        /// <summary>
        /// save doctor
        /// </summary>
        /// <param name="doctorModel"></param>
        /// <returns></returns>
        [HttpPost]
        [Route("[action]")]
        public IActionResult Savedoctors(Doctor doctorModel)
        {
            try
            {
                var model = _doctorService.SaveDoctor(doctorModel);
                return Ok(model);
            }
            catch (Exception)
            {
                return BadRequest();
            }
        }

        /// <summary>
        /// delete doctor
        /// </summary>
        /// <param name="id"></param>
        /// <returns></returns>
        [HttpDelete]
        [Route("[action]")]
        public IActionResult DeleteDoctor(int id)
        {
            try
            {
                var model = _doctorService.DeleteDoctor(id);
                return Ok(model);
            }
            catch (Exception)
            {
                return BadRequest();
            }
        }
    }
In ASP.NET Web API, a controller is a class that handles HTTP requests from the client.
In the constructor of our controller, we implement dependency injection for our service (IDoctorService).
Now I would like to explain again how the ASP.NET Web API knows how to map URIs to our controller methods.
The ASP.NET Web API framework for each HTTP message decides which controller receives the request by consulting a route table.
/api/{controller}/{id}
The {controller} and {id} are just placeholders.
{controller} is matched to the controller name. {controller} in my case is Doctor.
The HTTP request method is matched to the method name. (This rule applies only to GET, POST, PUT, and DELETE requests.)
/api/doctor will match the GetAllDoctors() method
/api/doctor/1 will match the GetdoctorsById(1) method
14) Build and run your application. When you do that the swagger page will open. See the image below.

Add a new Doctor
Expand Post (Savedoctors method) and click on the try it out button. The JSON fields are editable, to add data in the model. Type the data that you want and then click on Execute button. The data is successfully inserted in the database. See the image below

If you query the database, you will see the data inserted in the table (Doctors Table).
Click on the Get method (GetAllDoctors) and then the Try it out button and then hit the Execute button. You will see the newly inserted data. See the image below.

Click on the Get method (GetdoctorsById) and then the Try it out button, insert 1 in the id field and then hit the Execute button. You will see the newly inserted data. See the image below.

You can try all yourself the other Api method, DeleteDoctor.
Hope it helps!!!
Repository Pattern with Entity Framework Core is obsolete October 17, 2021
Posted by fofo in ASP.Net Core, Entity framework, Entity Framework Core.Tags: Repository Pattern
add a comment
Let me start this post by saying that “The repository/unit of work patterns are not useful with EF Core”.
Many developers when building multi-tier, multi-layered application use patterns to enhance the testability and usability of their apps. They often use UoW and Repository patterns which in general are great patterns to use.
For example, in the case of the repository pattern, the purpose is to abstract away the low-level database query logic.
Developers used to write SQL statements in their code and the repository pattern was a way to move that SQL out of individual methods scattered throughout the code base.
Developers building applications with ASP.Net Core and Entity Framework Core should not use UoW and Repository pattern anymore. EF Core supports unit testing and mock contexts.
EF Core is 100% test-friendly, one can even mock what e.g SaveChanges method (returns the count of records that were affected) returns.
It also supports injecting the database context into the web request by using a service that uses Dependency Injection.
In a nutshell, Entity Framework already implements a repository pattern. DbContext is the UoW (Unit of Work) and each DbSet is the repository. By implementing another layer on top of this, is not only redundant, but makes maintenance much more harder.
Let’s ask ourselves. What is DbContext? It is a class. This is a no-brainer. It is a class that contains multiple properties, each implementing IDbSet. IDbSet is the same thing as IRepository.
It contains methods to Add, Delete etc. It also implements IQueryable – so you have the whole LINQ query set including things like First, Single, Where.
The example below demonstrates how to add an Entity Framework Core database context as a service using Dependency Injection in an ASP.Net MVC Core 3.1 application. These are just snippets and not the whole codebase.
We will also demonstrate how to reference the database context from an MVC Controller.
We need to have a connection string e.g DefaultConnection. This is confugured in the appsettings.json, appsettings.Development.json files.
In this example the database server is SQL Server.
You also need to install Microsoft.EntityFrameworkCore.SqlServer Nuget package.
Model/ViewModel class:
public class Customer {
    [Key]
    public int Id { get; set; }
    public String FullName { get; set; }
}
DBContext class:
public class ModelContext : DbContext {
    public ModelContext(DbContextOptions<ModelContext> options) : base(options) {
    }
    public DbSet<Customer> Customers { get; set; }

}
We now need to set up dependency injection by configuring the Startup.cs file:
public void ConfigureServices(IServiceCollection services) {
  services.AddDbContext<ModelContext>(options =>
    options.UseSqlServer(Configuration.GetConnectionString("DefaultConnection")));
  services.AddControllersWithViews();
}
Now we need to make DBContext accessible from within each controller e.g CustomerController through the constructor. See below (just snippet)
public class CustomerController: Controller {

private readonly ModelContext _context;


public CustomerController(ILogger<CustomerController> logger, ModelContext context) {
  _logger = logger;
  _context = context;
}

 public IActionResult Index() {
        List<Customer> AllCustomers = _context.Customers.ToList();
        return View(AllCustomers);
    }


}
To recap, when writing code try to avoid needless complexity by over-engineering things. Getting data from the database is a common operation and by adding additional layers of abstractions usually only makes it much harder to maintain the code.
Looking into Structured Logging with Serilog in an ASP.Net Core application April 16, 2017
Posted by fofo in ASP.Net Core, logging.Tags: log, logging, seq, serilog
3 comments
In this blog post I am going to look into logging and more specifically into structured Logging. There is no need to stress how important logging is in any .Net application.
I am going to talk about structured Logging with Serilog and Seq. I am going to create an ASP.Net Core application to demonstrate logging with Serilog.
Let me give you a definition what structured logging is before we go any further.
Structured logging is a way of logging where instead of writing just plain text data to our log files we actually write meaningful log data by writing properties that are relevant to our application and values for those properties. This is a huge plus because now that we have structured data we can go on and write queries against.
Logging to a text file, we log all sorts of information. We have different levels of information like warnings, errors, critical messages e.t.c. Ιn order to get some meaningful information out of it we have to use external tools or use regular expressions. In many cases we have logged data which is written in many log files. As you can understand in order to get the data we want, we need either to merge all those files or run the same regular expressions across all the files.
With structured logging we can have different queries, more intelligent queries. We can query and get data for a particular order, we can get error log messages where order value is more thatn 5.000 USD. We could get data regarding failed login attempts.
One of the most important logging libraries is the Serilog logging library. When building your application, you can install the Serilog NuGet package and once you have installed this NuGet package you can start writing simple log messages. These could be messages such as information messages or more important error messages, and when you configure Serilog in your application you can decide where you want our log output to be be written to.
We could write to rolling text files, so this means a new text file will be created automatically each day or we could write our log messages to a NoSQL data store like RavenDB or Seq.We can configure multiple destinations to be used by the same logger, so when we write a log message it will automatically be written to multiple output stores.
When we’re using Serilog there’s a number of different places we can write our application log data to, such as the console, rolling files or single files.We can also write log data to MongoDB, RavenDB and Seq. I have mentioned Seq a few times so let me explain what Seq is.
It runs as a Windows service and it allows us to configure our applications, via Serilog, to log structured messages to it via HTTP or HTTPS. When our applications log structured messages to Seq server it stores named properties/values so we can query them later. As part of the Seq server Windows service, it also provides a web interface, so we can connect to it via a browser. This browser application allows us to view log messages and write queries against them.
You can download Seq here.
Follow the instructions of the wizard to install the Seq windows service. When you install it you must see something similar like the picture below. The default port for listening to events in Seq is 5341 but in my case I choose 5343 port.

Before we begin with our hands on example I must dive into the mechanics of Serilog.
Besides information messages we can log structured data using Serilog. We can do that by using named properties and values e.g
Log.LogInFormation (“Added user {Username}, Team {UserTeam}”, name, team);
You can see between the braces here we’ve got this UserName and Team and these are named properties in Serilog.
When we define Named Properties we need to give them some values, so after we’ve defined the message containing these named properties, we then specify the actual values for the name and the team.
When we embed structured data in our message here, if the underlying sink supports it, these named properties and their associated values will actually be stored in the underlying data store allowing them to be queried. If you want to see all the available sinks currently supported click here.
Serilog has a number of different concepts of data types, the first or what it defines as scalar data types. Serilog sees these scalar data types as things that can be reliably stored without needed to alter their representation in any way. The types of scalar data include Boolean, numbers, strings, dates and times, as well as a few other things.
In the Boolean category we’ll just have the bool type. In the numbers category we have the basic numbers.
In the string category we have our string type and for dates and times we have the DateTime, DateTime Offset, and TimeSpan types. For the others we have Guids, URIs, as well as nullable versions of these other scalar types, so when Serilog sees that we’re using one of these values for a named property it’ll just go ahead and store its basic representation without doing any further processing on the value.
As well as scalar values, Serilog will store collections and objects. If the type implements IEnumerable it will go ahead and iterate through the contents of this IEnumerable and store the values. Serilog will also store the contents of a dictionary for us, but with a caveat that the key to the dictionary must be one of the types that Serilog considers to be scalar, so here the key to the dictionary is a string type.
Now that we have a good understanding of structured logging and Serilog, we can create a simple ASP.Net Core application. Launch the VS 2015 Studio and create a default ASP.Net Core Web application. Build and run the project.
The application out of the box should look something like this

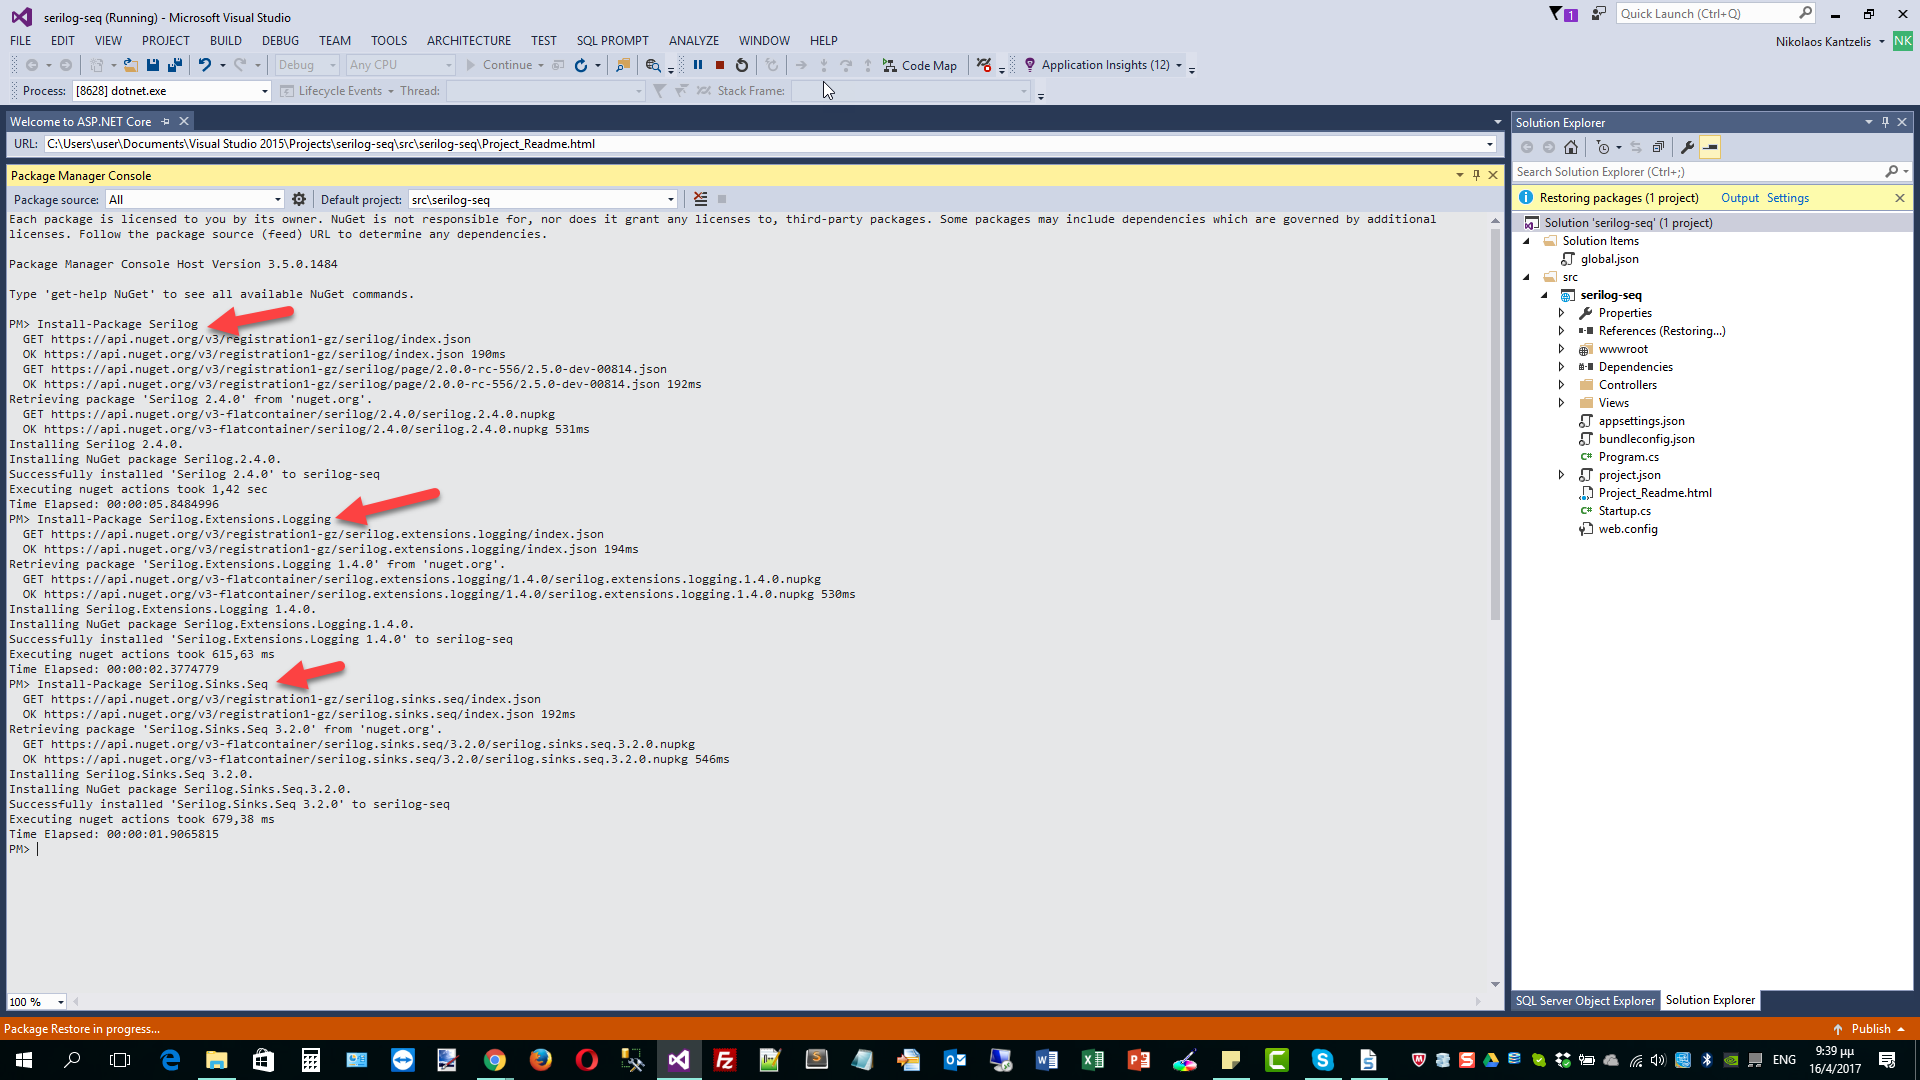
I am going to install some packages now.
I will install Serilog, Serilog. Extensions.Logging and Serilog.Sinks.Seq
I will use the Package Manager Console to do that. Have a look at the picture below.
We need to do some configurations in the Startup.cs file.
public class Startup
{
public Startup(IHostingEnvironment env)
{
var builder = new ConfigurationBuilder()
.SetBasePath(env.ContentRootPath)
.AddJsonFile("appsettings.json", optional: true, reloadOnChange: true)
.AddJsonFile($"appsettings.{env.EnvironmentName}.json", optional: true)
.AddEnvironmentVariables();

if (env.IsDevelopment())
{
// This will push telemetry data through Application Insights pipeline faster, allowing you to view results immediately.
builder.AddApplicationInsightsSettings(developerMode: true);
}
Configuration = builder.Build();
Log.Logger = new LoggerConfiguration()
 .MinimumLevel.Debug()
 .Enrich.FromLogContext()
 .WriteTo.Seq("http://localhost:5343")
 .CreateLogger();
}
I added the lines in bold in the Startup class.
I also need to add a line of code in the Configure method also in the Startup.cs file.
public void Configure(IApplicationBuilder app, IHostingEnvironment env, ILoggerFactory loggerFactory)
{
loggerFactory.AddConsole(Configuration.GetSection("Logging"));
loggerFactory.AddDebug();
loggerFactory.AddSerilog();

app.UseApplicationInsightsRequestTelemetry();

if (env.IsDevelopment())
{
app.UseDeveloperExceptionPage();
app.UseBrowserLink();
}
else
{
app.UseExceptionHandler("/Home/Error");
}

app.UseApplicationInsightsExceptionTelemetry();

app.UseStaticFiles();

app.UseMvc(routes =>
{
routes.MapRoute(
name: "default",
template: "{controller=Home}/{action=Index}/{id?}");
});
}
I added the line in bold to add Serilog to the ILoggerFactory that is passed into the Configure() method.
Now if we build and run the application again, in the Seq browser window interface we will see something like the picture below.
All the events (all detailed events until the Home page is fully served) are logged with Serilog and we can see them in Seq. We can search through them very easily. Have a look at the picture below.

In order to use Serilog to log our custom events we simply need to start logging from our own controllers.
In my sample application so far I have only the Home Controller. In order to start logging from my controller is to create an instance of dependency on type ILogger<T>
public class HomeController : Controller
{

readonly ILogger<HomeController> _logger;
 public HomeController(ILogger<HomeController> logger)
 {

_logger = logger;
 }

public IActionResult Index()
{
 _logger.LogInformation("Hello, world!");
return View();
}

public IActionResult About()
{
ViewData["Message"] = "Your application description page.";

return View();
}

public IActionResult Contact()
{
ViewData["Message"] = "Your contact page.";

return View();
}

public IActionResult Error()
{
return View();
}
}
I have added some lines (in bold). Build and run your application. Switch to the Seq browser window and search for “Hello”.
Have a look at the picture below.

We can pass an object as a property that is of type IEnumerable. Serilog will treat this property as a collection.
public IActionResult Index()
{
var team = new[] { "Panathinaikos", "Barcelona", "Liverpool" };
 _logger.LogInformation("My fav team is {Team}", team);
_logger.LogInformation("Hello, world!");
return View();
}
I added some lines in bold below in the Index method of the Home Controller.
Build and run the project again.
When I switch to the Seq browser window I see something like the picture below.

Let me create a simple class object and log its values.
Firstly, create a folder “Models” in your project. Then add the following class in it.
 public class ContactModel
 {
 public string Name { get; set; }
 public string Surname { get; set; }
 public string Email { get; set; }
 }
Then inside the Index method of your HomeController.cs add the code (in bold)
public IActionResult Index()
{
//var team = new[] { "Panathinaikos", "Barcelona", "Liverpool" };
//_logger.LogInformation("My fav team is {Team}", team);
//_logger.LogInformation("Hello, world!");

var contact = new ContactModel();

contact.Name = "Nick";
 contact.Surname = "kantzelis";
 contact.Email = "nikolaosk@admin.com";

_logger.LogInformation("Contact Name is:{@ConctactModel}", contact.Name);

return View();
}
Build and run the project again.
When I switch to the Seq browser window I see something like the picture below.

There are different logging levels available to us in Serilog. We can use verbose events to log very low-level debugging and internal information about what our code’s doing. Then we have debug level of events, to log events related to the control logic, so which modules or branches of the application are being used, as well as diagnostic information that might help us diagnose faults, but not necessarily as low-level as the verbose events.
We can think of the information level events as the ability to log events that are of some interest to external parties, so these high-level events could be something like a user has just placed an order for a certain value.
Next, we have the warning level events. We can use this level to log information about potential problems that may be occurring in the application, so even if the system is not currently experiencing any actual errors, we can use this log level to give us advanced warning about things that could potentially break in the future.
Next, we have the error level events and these errors allows us to log information about unexpected failures in the system, so if there’s been an error in the system, but we’re still able to continue running the system, we could use this error level event. If, however, a failure has occurred and it’s actually stopped the system from being able to process any more information, we can use the fatal level event. This level of event allows us to log information about critical system failures.
There are various ways you can format your messages as we saw earlier in our examples.Formatting is another great strength of Serilog.
You can also log events selectively by using filters. For example we could write something like that
Log.Logger = new LoggerConfiguration()
.MinimumLevel.Debug()
.Enrich.FromLogContext()
.WriteTo.Seq("http://localhost:5343")
.Filter.ByExcluding(Matching.WithProperty<int>("Count", c => C > 30))
.CreateLogger();
In this post we looked into structured logging, Serilog, sinks, Seq, data types supported by Serilog, formatting options of Serilog and filtering capabilities of Serilog.
Hope it helps!!!