Using the wizard control in asp.net pages November 22, 2008
Posted by fofo in asp.net 2.0, C#.Tags: asp.net 2.0, C#, wizard control
trackback
In this post I would like to talk a bit about a web server control that has been implemented back in the Asp.Net 2.0 Framework but for some reason even if it is very useful, many developers do not know how to use it and when to use it. This is the Wizard control. Basically this control allow us to create a mechanism that requires the collection of data over a number of steps. You can do that with multiple pages but in this case you need to manage the state and the data between the pages.
This wizard contains a number of steps that are easiy configurable.
We will create a little asp.net application with C# to demonstrate the use of this control
1) Lanch VS and choose C# as your preferred language
2) Choose Asp.Net Web Application from the templates
3) Give your project a name
4) Place a wizard control from the Toolbox on the Default.aspx page. Leave the default name.Select the wizard control and click the smart tag (the arrow in the right-hand upper corner) and choose Auto format.
Choose a format of your choice from the available ones. You can always change the colors and fonts of a pre-decided format from the styles area of the properties window.
5) I know it is a little early but run your application.
You will see that you have Previous,Next and Finish buttons. Just click them and play around.
Close the page and in your default.aspx just select the wizard control.From the properties window, find the wizardsteps, Collection.
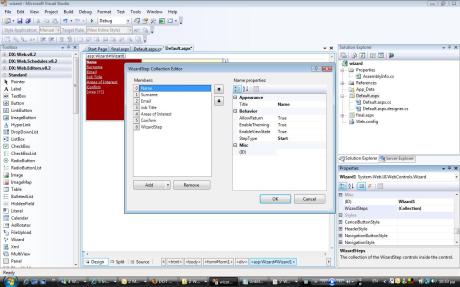
Click on the ellipsis and you will see a picture like the one below (in my case it has the complete steps)
In my example (because I work for a company that organises events on I.T) I have created a step-by step navigation scheme to create a feedback form.
In this window you can create as many steps you want and call them as you wish. Pay more attention to the StepType property.
After you finish adding steps, click the OK button.
Select the wizard control again. Click the smart tag (the arrow in the right-hand upper corner).
Select the step you want and drag and drop the controls you want onto this step. In my example I have a step called Name and i place a textbox control in this step. I follow the same pattern for all the other steps.
If you notice carefully in the properties window you will see 2 properties CancelDestinationPageUrl, FinishDestinationPageUrl.
You can create 2 new .aspx pages and name them, Cancel.aspx and Finish.aspx.
In the Cancel.aspx write something like “you have chosen to cancel…”
In the Finish.aspx write something like “Thank you”
Then you just set the values of the above properties to the respective pages.
Now you can run your application and see all the steps(and in each step the controls you have added) you have created and click the Next and Previous,Finish,Cancel buttons on the wizard.
Hope everything makes sense and if you need the source code send me an email.


This is best one article so far I have read online. I would like to appreciate you for making it very simple and easy. I have found another nice post related to this post over the internet which also explained very well. For more details you may check it by visiting this url…….
http://mindstick.com/Articles/d2707ea4-3836-4390-ab0b-670e12e6b2dc/?Wizard%20Control%20in%20ASP.Net
Thanks